Showing posts with label food. Show all posts

Friday, April 27, 2012

Cheesy Italian Baked Bread

taken from the boyfriend :-D

My boyfriend loves to cook anything that involves meat, as long as it's on the grill.  Not long after we started dating I talked him into cooking us steaks on the stovetop, since we didn't have a grill at our apartment.  One night when he cooked me a steak, I was told to busy myself in the living room while he cooked me dinner.  I tried very hard not to sniff in the general direction of the kitchen, but they're right next to each other so it was pretty much impossible. 

I was wonderfully surprised when he told me to open my mouth and take a bite, and I was excited when I tasted crunchy bread and cheesy goodness.  Here's the recipe:

Ingredients
  • Fresh Mozzarella (I prefer pearls, the pictures are using slices)
  • Black Pepper
  • Salt
  • Dried Oregano
  • Dried Minced Garlic
  • Italian loaf
  • Olive oil

Instructions
1. Preheat oven to 450 degrees, and cover a pan with tin foil (I have a small round one that I use).
2. Cut two slices about 3" thick from your italian loaf, and then cut them evenly in half with a bread knife.

3. Drizzle the tops of each slice with olive oil, and then turn face down and put in the oven for 2 minutes, 30 seconds.


Post oven.


4. Add a dash of salt and pepper to each slice.  I have a double salt/pepper grinder, and I do 1 grinding of salt and 2 grindings of pepper per slice.


5. This is where the mozzarella pearls come in handy.  If you smush each pearl, you'll use a few per slice, if you use sliced mozzarella... then you have to shred it by hand.  I use about 2 slices for this, and quite a few pearls.

Mozzarella!!
6. Sprinkle a tiny amount of the garlic on each piece of bread, and drop a few sprinkles in between all the slices in the center of the pan.

Mmm... don't befriend any vampires with this dish.
7. Put back in the oven for another 2 minutes, 30 seconds.

Melty-amazing-ness.
8. Then sprinkle on some oregano, and enjoy!


Tasty Tomato & Kalamata Olive Salad

Tasty Tomato & Kalamata Olive Salad

borrowed & modified from Baked Bree Deconstructed Chicken Kiev

When I tried this recipe from her, I thought the chicken kiev turned out all right, but I fell in LOVE with the salad.  I made three times as much and just munched on it because it was oh-so-tasty.

Ingredients
  • olive oil
  • 1 cup cherry tomatoes
  • 1/2 cup kalamata olives
  • lemon zest
  • 1/2 cup feta cheese
  • 1/8 tsp dried parsley 
  • salt and pepper
Instructions
  • Wash and then halve the cherry tomatoes and throw them into a decent sized bowl for mixing.
  • Halve the kalamata olives and throw them in as well.
  • Zest half a lemon, and sprinkle the salad with about a tablespoon of olive oil
  • Grind some pepper and add a dash of salt, and your parsley
  • Sprinkle in feta cheese, and mix contents with wooden spoon
Premixing, this picture came out MUCH better.

Post mix (bad lighting).

Sunday, April 22, 2012

Chicken Parmesan

Chicken Parmesan

Mmm... FOOD :-D

Ingredients
  • 2 chicken breasts (skinless, boneless, like you can buy in the grocery store)
  • 1/2 C milk
  • 1/2 C all-purpose flour
  • 1 large egg, beaten
  • 1 1/2 C Italian seasoned bread crumbs (if you don't have any: my recipe)
  • 1/2 C extra virgin olive oil
  • 4 Tbs butter (I prefer sweet cream salted)
  • 2 C your favorite tomato sauce
  • 1/2 C shredded mozzarella cheese
  • Sundried tomatoes (optional)
Instructions
  1. Place the milk and eggs in separate bowls, and put the flour and bread crumbs in separate tupperware (so you can close the lid and shake 'em up!).
  2. Dip each breast in the following order: milk, flour, eggs, bread crumbs.
  3. In a large skillet, melt the butter with the olive oil over medium-high heat until sizzling.  Reduce the heat, and cook the chicken until golden brown and the juices run clear when cut with a knife, about 3-5 minutes per side.  *Note* If you're only going to cook 1 breast at a time, half the butter and olive oil.  Remove to a baking sheet lined with paper towels.
  4. Dribble 1/2 cup of the warm tomato sauce in the bottom of a 9"x9" baking dish.  Place each chicken breast in the middle and mush 'em around in the sauce to make sure they're well coated on the bottom.  Cover with another 1/2 cup of the tomato sauce, and half of the shredded mozzarella on top of each chicken breast.  *Note* If you chose to include sundried tomatoes, I put mine on before the mozzarella.
  5. Broil in the oven for about 5 minutes until the cheese is melted and golden brown.

Italian Seasoned Bread Crumbs

Italian Seasoned Bread Crumbs

to make at home (instead of buying at the store)

After I moved in with my boyfriend I thought I had remembered everything I had unloaded from my pantry into our new pantry.  Apparently not... because I didn't have any Italian bread crumbs (needed for chicken parmesan).  And I think "oh CRAP!" until I got creative.  

Ingredients
  • 2 C (lightly smushed) of hand torn slices of your favorite Italian loaf
  • 1/3 C shredded parmesan cheese
  • 1 tsp garlic powder
  • 1 Tbs dried parsley flakes
  • 1 tsp dried oregano
  • 1 tsp dried basil
  • 1/2 tsp black pepper
Instructions
Add half of the ingredients to a food processor and blend.  Remove to a tupperware, then the other half.  Unless of course you have a large food processor, then do the whole thing at once!  Mine is pretty small though.  Makes about 2 1/2 cups.


Friday, April 13, 2012

Pot Roast of Beef Braised in Red Wine

Pot Roast of Beef Braised in Red Wine

modified from p. 393 Essentials of Classic Italian Cooking

Anybody who knows me, knows I am a proud Native Texan.  Which means I love my beef products.  There's nothing that can make me happier than a pot roast for dinner, homemade bread with butter, and maybe some delicious ice cream for dessert.

It's been a long week, I pulled an all-nighter for a homework assignment last night that has been extended twice and everyone in my class is still unable to complete the assignment.  Also, my boyfriend received his job offer and is quite ecstatic about his starting salary.  So we had dinner with our best friends at his favorite eatery (Buffalo Wild Wings), steak for dinner last night, and my pot roast for dinner this evening.  Hey... I like to eat :-D

Ingredients
  • 2lbs chuck roast
  • 1 Tbl butter
  • 3 Tbl minced onion (I use dry minced, that would be 1 Tbl)
  • 3 Tbl carrot chopped very fine (equates to 3 or 4 baby carrots)
  • 1 1/2 C red wine (they recommend a Barolo, you can use a Syrah, Shiraz... I just use wines I really love and adore)
  • 1/2 C beef broth combined with 1/2 C water
  • 1 roma tomato
  • Pinch of Thyme
  • Vegetable oil
  • Salt (for the meat)
  • Ground Pepper (from your pepper grinder, to taste)
  • 1/4 tsp fresh marjoram (1/8 tsp dried)
  • 1 beef bouillon cube
Instructions
    1. Preheat oven to 350
    2. Heavily salt and pepper your roast.  Because quite a lot of it comes off when the meat is seared, go ahead and put a decent amount.


    3. I usually get a very thick cut of chuck, and the sides of it are VERY difficult to make salt and pepper stick.  So instead of having flavorless pieces, my boyfriend came up with the idea to smash a beef bouillon cube, and use enough olive oil to turn it into a paste.  Whatever you don't use, keep to use later.


    4. Heating the pan... make sure your pan is EXTREMELY hot.  As soon as you put your chuck in, it will immediately cool the pan.  For this step we use olive oil, so when it starts to smoke, you know you're ready to put in your meat.
    5. Put your meat in the pan and brown it well all over


    NOTE: You will most likely need to hold the meat with the tongs to brown the sides (like so):


    6. Transfer your seared meat to a plate and set aside.  Put the skillet on a burner you're not using, we'll need the contents later.

    Doesn't it look pretty?
    7. Choose a pot with a tight-fitting lid, probably going to be the largest pot in your set.  I think most "large" pots with handles on the side (instead of the long extended handle) are about 8qt.  

    Put in 2 Tbs vegetable oil, butter, and onion, then turn on the heat to medium and cook the onion until it becomes a pale gold.  
    Note: if you're using dried onion, this is about a minute, you'll have to move quickly.  Add the carrot, stir thoroughly and coat well; cook for 4 minutes then put in the meat.


    8. Turn the heat to medium-low for the burner you placed your skillet on.  Add in the rest of the bouillon paste and enough olive oil to pick up most of the debris left in the pan from searing the roast.  Once the pan has started to warm up, pour the wine in and allow the wine to bubble briskly for about a minute, while scraping the pan with a wooden spoon to loosen cooking residues stuck to the bottom and sides.  


    Add the contents of the skillet to the pot with the meat.

    9. Add the broth to the pot.  If it doesn't the liquid doesn't reach halfway to 2/3 up the side of the meat, evenly increment the broth until it does (meaning add equal amounts of broth and water).  

    Add the diced tomato, thyme, marjoram, salt, and several grindings of pepper.  Turn the heat on to high, bring the contents of the pot to a boil, then cover the pot and put it on the middle rack of the preheated oven.


    9. Cook for 3 hours, turning the meat every 30 minutes and basting it with the liquid in the pot.  
    30 minutes: pre turn (left), post turn (right)
    NOTE: The more liquid you use to baste, the less you will have when all is said and done with.  I use a pretty cool baster, and I fill it up about one and a half times each half hour.

    60 minutes: pre turn (left), post turn (right)


    90 minutes: pre turn (left), post turn (right)

    120 minutes: pre turn (left), post turn (right)

    150 minutes: pre turn (left), post turn (right)

    After 3 hours when it comes out of the oven!

    In case the liquid in the pot has evaporated or has been absorbed before the meat is done, add 3 to 4 tablespoons of water.  Cook until the meat feels very tender when prodded with the fork.


    10. I'm never able to cut the meat up, usually it pulls apart like cotton candy with tongs in the pot before I have a chance to remove it.  Use a baster to juice the meat once you have it on a plate.  


    Drink with the rest of the wine you used :-) and ENJOY!!

      Saturday, April 7, 2012

      Buffalo Wings

      Buffalo Wings

      modified Hooter's Recipe

      I love my boyfriend.  I really do.  If I didn't, I wouldn't make him his favorite meal (buffalo wings) every 5th time he asks.  Yes, every fifth (it takes a week just to get help to clean the fryer, so I have to pace myself between kitchen fiascos).  

      And yes, do this for Superbowl parties.  Or any football game.  Or any... bad movie showing.  Make up an excuse (the boyfriend always does).

      Ingredients
      • 1 cup all purpose flour
      • 1 tsp. salt
      • ½ tsp. cayenne pepper
      • ½ tsp. paprika
      • ½ tsp. black pepper
      • ½ tsp. garlic powder
      • ½ cup butter/olive oil
      • ½ cup Frank’s Red Hot Cayenne Pepper Sauce
      • 2 pkgs. wingettes
      Directions
      1. In a container suitable for coating chicken, combine flour, salt, cayenne pepper, paprika, black pepper and garlic powder.  
      2. Coat chicken in dry mixture.
      3. (Optional and highly recommended) Refrigerate for at least 1 hour.  Apply a second coating of the dry mixture immediately before frying.
      4. ADDITION: If you choose to refrigerate the wings, and you have sufficient powder for a second coating, refrigerate the powder as well. Preserves it from all the chicken oogey-ness.
      5. In a medium saucepan, melt butter and stir in Frank’s sauce.  Turn heat to low and keep warm on stove top.
      6. Deep fry chicken in 375 degree F oil for 13 minutes.
      7. Immediately coat chicken in buffalo sauce mixture and remove from saucepan with tongs.
      Don't forget to take antacids with your beer and wings :-)

      Wednesday, March 28, 2012

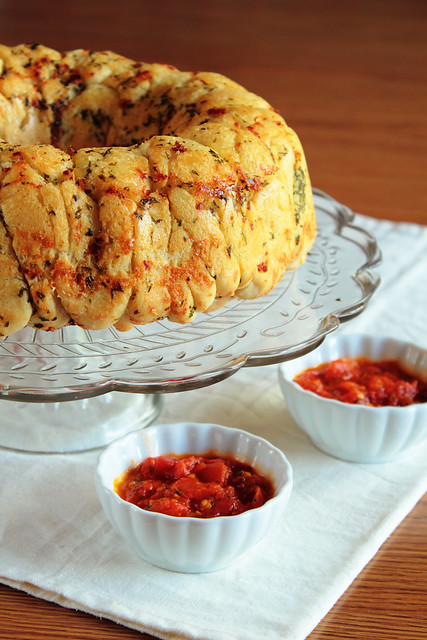
      Garlic Parmesan Pull Apart Bread

      Garlic Parmesan Pull Apart Bread

      via The Pastry Affair

      I love this recipe.  When my boyfriend and I decided to get into the habit of having one Saturday every couple of weeks where we made dinner with our best friends, this is one of the first things that we made.  And by made I mean barely escaped the oven intact because I nearly nabbed it out of the bundt pan before anyone could notice.

      Looks scrumptious, don't it?
      Ingredients
      • 2 tsp active dry yeast
      • 1 1/3 cup lukewarm water
      • 2 Tbs extra-virgin olive oil
      • 2 tsp salt
      • 3 1/2 cups all-purpose flour
      • 1/4 cup (2 Tbs) butter, melted
      • 1 Tbs dried parsley flakes
      • 2 cloves minced garlic
      • 1 cup freshly grated parmesan cheese
      You will also need: 
      • Large mixing bowl (I prefer glass)
      • Bundt pan
      • Nice thin kitchen towel
      • An oven

      In a large mixing bowl, mix together the yeast and water.  Let it sit until 5 minutes so the yeast gets nice and foamy.  Mix in the olive oil, salt, and flour.  If you have a stand mixer, attach the dough hook and knead the dough for 5-6 minutes until it's elastic.  If you are doing this by hand, knead the dough on a lightly floured surface until elastic, 7-10 minutes.  

      *If you have a bread machine, be sure to follow the machine's instructions on throwing everything together*

      Transfer dough to a lightly oiled (I prefer glass) bowl and cover with a clean kitchen towel.  Allow to rise for 1 1/2 - 2 hours, or until the dough has doubled in size.

      **Hint** I always put the bowl on top of a dryer that's running, can cut down your rising time by as much as 30 - 60 minutes.

      In a small bowl, combine melted butter, parsley flakes, and minced garlic.  Set aside.

      My first modification to the recipe, is to use MUCH more parmesan cheese.  Makes it gooey-er and scrump-didili-umptiouser.  I do a thin layer of sprinkling on the bottom of the bundt pan until you can't see the metal under the cheese.  Punch down the dough.  Or squash, squish with your fingers...  Tear off small pieces of dough (a wee pinch, size of a truffle or standard cookie dough ball), coat in the butter/herb mixture, and squish down on the cheese layer in the bottom of the bundt pan.  Repeat the process until you've made one complete layer on the bottom of the pan, then sprinkle a nice layer of parmesan cheese.  They got to 3 layers, I only got to 2.

      Once you run out of dough (and cheese!) cover the pan with the same kitchen towel you used earlier, and let sit until dough has doubled in size, 20 - 30 minutes.  Again, I recommend putting on top of a running dryer :-)

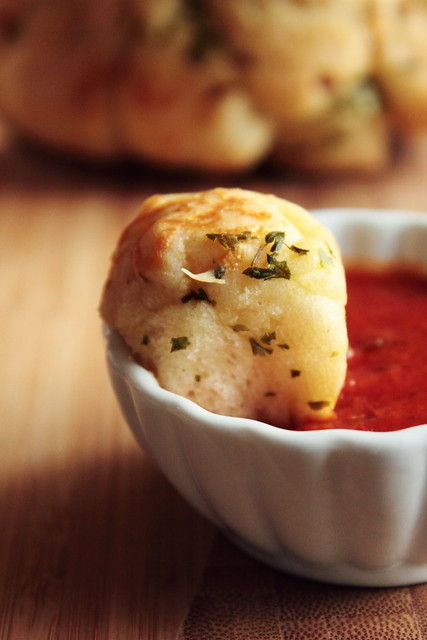
      Preheat oven to 350 degrees.  Bake for 25 - 30 minutes, or until the bread has turned golden brown.  Serve with a hot side of marinara or some delicious spaghetti sauce.

      Enjoy!!

      Five Minute Chocolate Mug Cake

      Five Minute Chocolate Mug Cake

      from iVillage

      When you're a college student with a sudden late night graving for chocolate and you don't keep a lot of ingredients on hand (or have a stove that works), this is perfect.

      Ingredients
      • 4 Tbl all-purpose flour
      • 4 Tbl sugar
      • 2 Tbl cocoa powder
      • 1 egg
      • 3 Tbl milk
      • 3 Tbl oil
      • 3 Tbl chocolate chips (optional)
      • 2-3 drops vanilla extract
      • 1 super-awesome coffee mug
      Directions
      Add dry ingredients to mug and mix up with a fork (or your finger).  Add the egg and mix thoroughly (fork is probably necessary here).  Pour in the milk, oil, and vanilla and mix well; make sure you scrape the sides of the mug and incorporate all of the powder and liquids.  Add the chocolate chips and mix again.

      Place the mug in the microwave and cook for 3 minutes (1000 watt standard).  The cake will rise over the top of the mug and deflate when the microwave kicks off.  Allow to cool a little, and tip over to a plate, wiggle around the edges with a knife if it gets stuck.  

      Eat with vanilla bean or cinnamon ice cream, and enjoy!